The vast majority of pilots use the VOR as a command instrument – turn left when the needle deflects left, and turn right when the needle deflects right. Then they learn about reverse sensing. If the OBS is set to the reciprocal course, the commands become reversed – turn right when the needle deflects left, and turn left when the needle deflects right. Naturally, most prefer to stay away from reverse sensing. As a result, they do a lot of knob twisting to keep the desired number at the top of the OBS. Those who use the five-T’s mantra would recall that one of the T’s stands for twisting the OBS knob. This technique works fine for the most part, but there is a simpler and more elegant way.
It is a less known fact that the original VOR receiver was designed as a course instrument. It was not designed as a “fly left” “fly right” indicator. This is why the needle was called a Course Deviation Indicator. This is also why there is a full circle of numbers on the face of the VOR. The needle points to the hemisphere where the selected course lies. The triangle pointer (also called the TO/FROM flag) points to the hemisphere where the station lies. Together, they point to a quadrant of headings that will intercept the desired course. Perhaps this is best illustrated through a few examples.

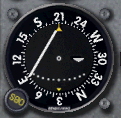
Let’s say we want to intercept and fly inbound to the station along the 030 radial. Normally this would require a course of 210. When we select 210 on the OBS, the needle deflects as shown. Which heading should we fly to get to the station along the selected course? Pause for a moment and think about how we normally do this. Most pilots would turn the OBS until the needle centers, get their current radial position, form a mental image of their relative position to the station, and then determine which heading to fly. This works fine, but it is a lengthy process and takes too much mental effort. The alternative method is a lot simpler, and requires less handwork and brainwork. Look at all the numbers along the needle-side (left-side) of the VOR face. The needle is pointing to a hemisphere of headings between 030 and 210. Turn to any one of those headings, and the needle will eventually center. Yes, it is really that simple! The fastest way to get there of course is to fly 120, which is directly against the needle. This will make a 90-degree intercept to the desired course. All other headings will intercept the course at a shallower angle. Now look at the triangle pointer. It points to a hemisphere of headings between 300 and 120. This is where the station lies. In order to fly towards the station and intercept the selected course, we need to pick a heading from the bottom left quadrant of the VOR. For example, 080 would be a good heading to fly. Once the needle centers, its hemisphere collapses to just two numbers – 030 and 210. Of these two numbers, only 030 lies in the direction of the station. This is the heading we need to fly to track the course towards the station.

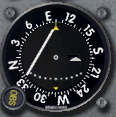
Let’s look at a second example: We want to intercept the selected course and track outbound from the station. This time we have to look at the needle and the tail of the arrow. They point to a quadrant of headings between 280 and 010. Pick one and fly it. Whether we turn left or right is immaterial. What matters is that we turn to the desired heading. When the needle centers, fly 280 to track outbound.
Notice that it doesn’t matter which number we put at the top of the OBS. We could put the desired course, or its reciprocal, and the indications will not change. There is no reverse sensing.

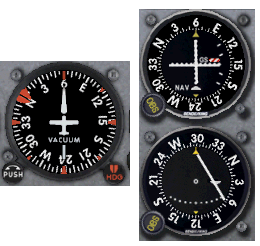
Here is another scenario. We are cruising along an airway. VOR1 is set to the airway radial, and VOR2 is set to an intersecting radial from another VOR. We want to know whether we have passed that intersection or still headed towards it. Here is how to do this in less than 5 seconds. Take a look at the panel. Our present heading is 060. That number is on the needle-side of VOR2. Therefore, we are still flying towards the intersection. Bingo. There is no need to twist any knobs, do any math or visualize our position. Why work hard to find the answer that is already written on the instrument?
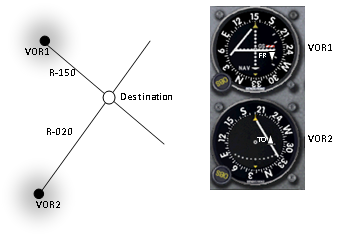
The next example highlights the most valuable use of this method. Let’s say we want to fly to an intersection of two VOR radials as shown below. We tune both NAV radios and set the OBS to the required radials. Both CDI needles hit the stop. What heading should we fly to get to the intersection? Using the conventional method, this would take several minutes of OBS-twisting and mind-bending visualizations.

Here is how to do this in less than five seconds. Look at all the numbers on the needle-side (left-half) of VOR1. Then look at all the numbers on the needle-side (right-half) of VOR2. Find a number that is common to both. How about 360? Fly that heading. No mind-bending visualizations are necessary. If VOR1 centers before the VOR2, we are left with only two choices – 330 or 150. Only one of these is still on the needle-side of VOR2. That would be 330. Fly that heading, and eventually both needles will center. Like before, it doesn’t matter whether we put the radials at the top of the OBS or at the bottom. The results will be the same.
The same technique works on a localizer. Put the localizer front course at the top of the OBS and fly it like a course instrument. Interpret the top numbers for the front course and the bottom numbers for the back course. There is no reverse sensing. Our brain will be free to attend to more important matters. The same technique works on CDI’s driven by a GPS. On the Garmin 430/530 unless you set the OBS to the selected track, it will keep popping up a reminder message.
Notice that we did not have to figure out our current position in any of these examples. We instantly knew where to point the airplane without twisting any knobs or doing any math. Once the airplane is headed in the right direction, we can leisurely attend to the task of locating our current position. This embodies the true utility of the VOR receiver. It presents the information in the order of their importance – heading first, position later.
Given the simplicity of this technique, it is somewhat mysterious why this is seldom taught during flight training. Most pilots are taught to turn towards the needle and ignore its numeric indications. This method works only when the heading indicator is aligned with the OBS. If they are different, the indications will produce meaningless commands. Additionally, turning towards the needle is more likely to promote needle chasing, especially when the pilot is under pressure. When the VOR is used a course indicator, the pilot must read the numbers and respond with an appropriate heading. It reinforces the importance of finding and holding a constant heading. Pilots trained under this system are more likely to be disciplined about their headings.
It is unfortunate that some avionics manufacturers have failed to recognize this important VOR feature. Some have dropped the station arrow and replaced it with the TO/FROM flag. Some displays have all the numbers tucked behind a plastic sleeve except the top and bottom numbers. The worst ones are the digital VOR displays. They have an LCD bar scale to simulate the needle deflection. There is no compass rose on the face of the instrument. It is interesting to note that technological improvements have actually made the VOR more difficult to use. There might be a lesson in this. Some things are better left the way they are. The VOR system might be a 50-year old technology, but it is one of the greatest inventions in aeronautical navigation. It is really too bad that we won’t have them for much longer.
Reference
“The VOR” by Joe Campbell, December 1995.
Leave a Reply